Cursor
The cursor functions allow the user to work with a specific row in the attribute table. Each row is called a record. In many ways, the cursor function is similar to the list function discussed previously, which was used to control files and fields (columns, attributes). There are three cursor functions that will be explored, the insert, update and search. For the cursor function to be used an input table from a shapefile or a feature class file (in a geodatabase) containing field names.
Search
|
The search cursor allows the user to explore the contents of a shapefile or feature class file without opening it in ArcMap Desktop.
|
|
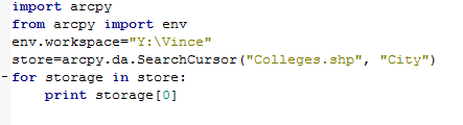
Figure 1: Search Cursor Script
|
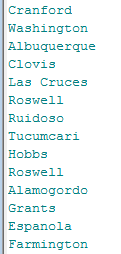
Figure 2: Results of Search Cursor
|
Insert
|
The insert cursor command allows the programmer the ability to insert a row into a shapefile or feature class file, the user does not have to have the file open. To input a single row a loop function would not be used in this example a new statement is being inputted multiple times using the while function, which will be fully explained in the code discussion.
|
|
|
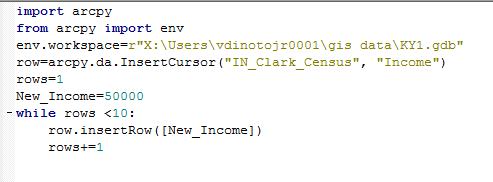
Figure 3: Inset Cursor Script
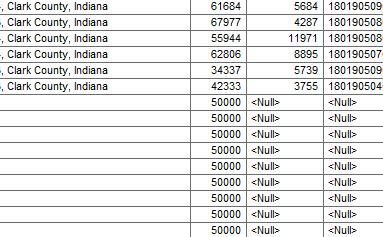
Figure 4: Results
|
Update
|
The Update Cursor command will allow the user to change a value in a field or if the field is blank, place a value into the field, thus no new rows are added like in the previous example. This function will also allow the user the ability to delete a row or rows of information. In general, a looping function will be used with this operation, so that the values can be updated in each row requiring a change. This command along with other commands could create a new field. For example, this method could automate the process performed in a tabular join that creates a new field with the appropriate format, so that the joining process with the spreadsheet can be accomplished. It is extremely important that the shapefiles or the feature class file is not open by any user. That would create file locks and most likely would prohibit the operation. The table in Figure 5 is part of an attribute table from a historical map that was digitized from a Sanborn map of the 1880s of Jeffersonville, Indiana. Examining this data shows that the individual who performed the digitizing did not use a domain when naming the railroad, since the same railroad
|
|
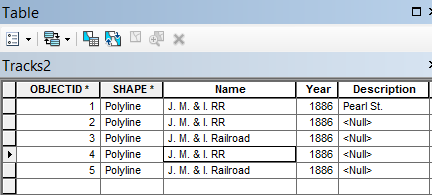
Figure 5: Attribute Table
|
has two different names. If a user attempted to query for the J. M. & I Railroad (Jeffersonville, Madison and Indianapolis), they would only get part of the record because of the two different formats the railroad is listed. The Update Cursor will be used to make all the names the same. Three different methods will be shown using the same data. Remember if a copy of the data is not made, after the first method runs successfully it will change the data. Thus the errors will no longer exist and cannot be successfully used for the next two demonstrated methods.
|
Method 1
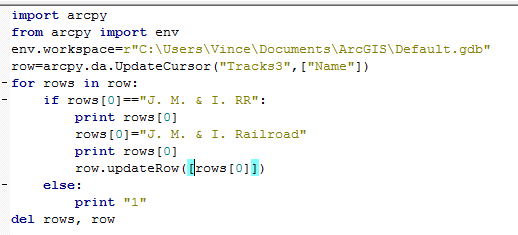
Figure 6: Code for Method 1
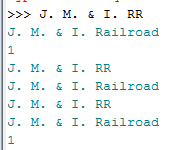 Figure 7: Output from Method 1
Figure 7, shows the method 1 scrip and is discussed below.
- Arcpy is loaded and the environment is set to the geodatabase.
- The variable ‘row’ is defined with the UpdateCursor. The first parameter is the file name and the second parameter is the field. Note the field name is in square brackets, indicating that a list has been defined.
- The for loop will be used for the operation with an if statement within. The for loop will ensure that each member of the list variable row is examined. The variable ‘row’ contains all the members from the field Name and each record is examined in the Name field, which will be the same item modified if required.
- The if statement is comparing the value of the individual cell and determining if it is true or false by what is contained in the quotation marks.
- If it is false it drops to the else statement, prints a number 1 and returns to the for statement.
- If it is true, it prints the current value in the cell,
- Redefines the cell to have a new value,
- Prints the new value
- Stores the value into the cell.
- The del command was used to delete the variables rows and row.
Method 2
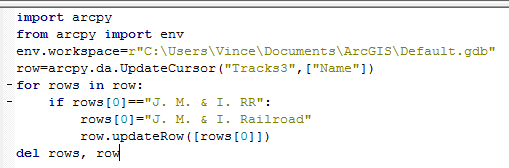
Figure 8: Method 2 Code
|
In the second method shown in Figure 8, the print statements have been removed which shows how the code flows, this code would be more appropriate for production level work, while the previous code is used for learning and troubleshooting. The data file was changed as a result of Method 1 and a new data file is required that contains the errors. To determine if this method if was successful the feature class file in the geodatabase would need to be opened in ArcMap (there are ways to determine this without opening the file).
|
Method 3 – with statement
In the third method the with statement will be used. The with statement is used to insure that all locks have been removed from a dataset once the operation has been completed. As noted earlier when certain operations are performed datasets are locked so that no other user can modify the data while being used. When the operation is executed, it is critically important to remove the locks so that the datasets are available to other users. This is of particular importance for files in a geodatabase, but these discussions do not refer to files contained in a relational database. The code shown in Figure 9, uses the with statement. The update cursor statement is part of the with statement and ends with a colon. This will cause all lines after this statement to be indented. The file will be locked until the script returns to the initial indentation level, which will then unlock the file.
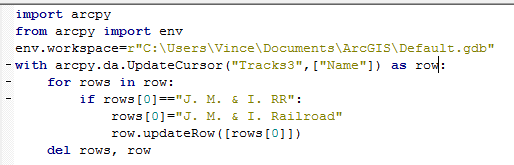
Figure 9: Using with Statement
This example is basically the same code as in Figure 8. It has been slightly modified to use the with statement. The only changed line is the fourth line from the top. Defining the variable row is done differently using the with statement and the colon at the end. The ‘as row’ variable is used instead of the equal sign as before, the equal sign would cause an error to occur. Note all the lines are indented after the with statement and since the script ends after the del statement, there is no returning back to the original indention. This method will insure that the file closes at the end of the operation.
